Tuesday, October 18, 2011

30 Day Challenge Day 8! Funky Fingers Down To Earth!

I've got another new polish here!  Today is gold polish day and I thought I'd finally try Funky Fingers Down to Earth.

It's a pretty generic gold polish, I think.  However, Funky Fingers always surprises me with their formula--I've never had a problem with them!  This polish went on great in two coats, but I added a third for pictures.  Removing metallics always kinds of sucks because they just spread everywhere, so my cleanup wasn't tooo great.  Oh well!

Check it out:


I wish my dang nails would grow faster.  I can't believe I broke off my ring-finger and pinkie so far down.  Lame!

Anywho--I think I would've liked this a little better if my nails were longer.  And maybe if I was tan again.  I just am not a huge fan of gold...although this I feel like is more of a champagne gold rather than a super yellow gold.  It's all right, I guess!

Do you guys have a favorite gold polish?  I want Warm and Fozzie from the Muppets collection! 

Well that's it for now!  Only one more "color" to go in my challenge, then I'm on to nail art!

<3 Whitney

P.S. don't forget about my giveaway!

Monday, October 17, 2011

30 Day Challenge Day 7! Color Club De-Luxe-Cious!

So this is the first day of my original challenge! Are any of you ladies doing polish challenges?

I picked silver nails for day 7! Now, I have plenty of foils and glitters, so I thought I'd try something new.

I bought Color Club's De-Luxe-Cious quite a while ago and never tried it even though I loved it in the bottle. It's got a blue-ish/gun metal gray with silver holo shimmers in it. LOVE! I tried to wear it on it's own but it is pretty transparent, so I did two coats of Sally Hansen Midnight Sky (Which I'll do a whole post on later!):

I love this by itself
And thennnn I added two coats of De-Luxe-Cious on top and got a wonderful combination:

I broke both my ring-finger nail and my poor pinkie...ugh so ugly :/


Blurred so you can see the glitter effect

I really loved this polish.  I can't believe I only have one Color Club, hah!  I would like to try it by itself again with maybe 3 or 4 coats and see how opaque I could get it to look...or maybe add one coat over black!  It's just so pretty in the sun.

Has anyone else tried this polish?  Did you LOVE it?!

<3 Whitney

Sunday, October 16, 2011

Conair Instant Heat Hot Roller Review + GIVEAWAY *CLOSED*!!

So the surprise is here!  I'm having a GIVEAWAY for an awesome set of hot rollers by Conair!

This is going to be an extra long post due to this--I'm going to post my review of these rollers and then down at the bottom will be the giveaway rules and forms.  So check it out!

The Conair Xtreme Instant Heat Rollers heat up in just 75 seconds and come with clips instead of the traditional pins.  

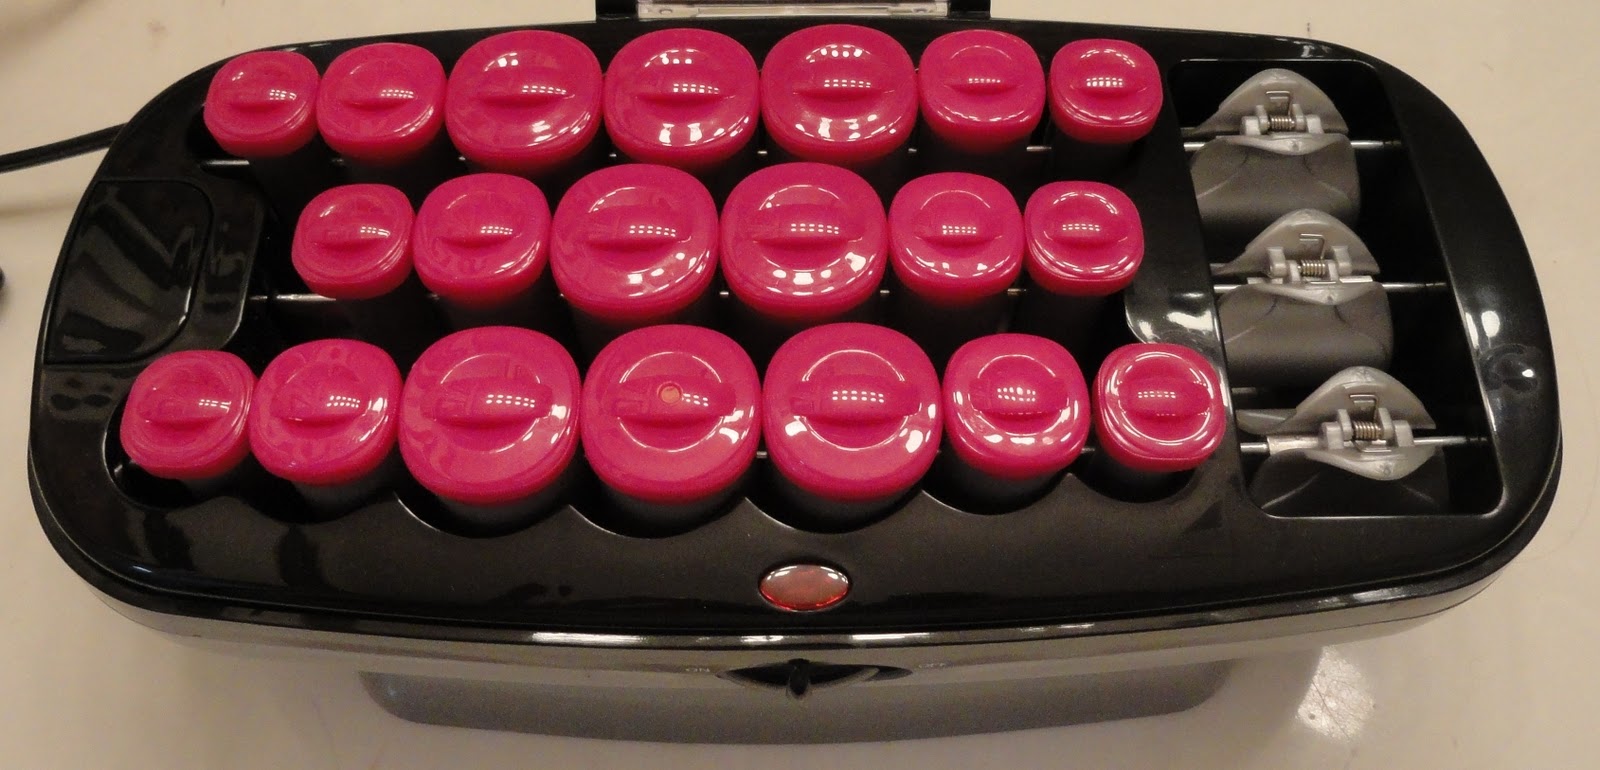
Here are the hot rollers I received for review!  They come with twenty ceramic rollers in three different sizes:

Pink rollers for the win!
Here's what they look like out of the box.  The set of rollers are all in a heated compartment along with a separate heating unit for three clips at a time.  I really like the idea of clips because my old set of hot rollers uses pins that you pretty much have to dig into your scalp to get to stay in. 


Here are all of the clips that come with the set!

Three different sizes: 6 medium .75", 6 large 1", and 8 jumbo 1.25"!
Now that you've seen all there is that come with these rollers, I'm going to show you my hot roller how-to:

Here is what my natural hair looks like, dried with no product.

In desperate need of a hair fix.
Now here's how I used these hot rollers--I've actually used them twice, once I started when my hair was already dry and the next time I used them right out of the shower in a different configuration.  I'll describe that later.

First, let the curlers heat up.  When the curlers are fully heated, one of them has a heat sensor that will turn from red to white.  They only need 75 seconds to heat up fully!

Heat sensor dot in the bottom middle curler
While you wait, you can apply some product to keep the curls in.  If you're like me with my zero-natural-curly hair, you'll need it!  If your hair is dry, lift up sections of your hair and apply hair spray!

I'm so excited about hair spray.  I used cheap Suave hair spray!
OR if your hair is wet, you can follow the following three steps:

Mousse and dry completely!  I used Victoria's Secret So Sexy Mousse because it smells soooo good.

Next take small sections of your hair, put the roller at the end, wrap your hair around it, and roll towards your scalp:

My face was too weird for this picture, so I just zoomed in on the important part :)

Then clip in place!


Finish rolling up 1" to 2" sections of your hair until it's all in rollers:

Bathroom lighting was terrible...
Now, if you want looser curls, you can leave the curlers in for less time.  If you want tighter curls, leave them in for longer.  Each time I have them in I left them in for about 10-15 minutes.  The tightness of your curl also depends on the configuration of your curlers.  Obviously the smaller ones will also give you tighter curls, with the tightness decreasing as the size of your roller goes up!

Initially I tried these curlers with the smallest curlers in my top layer of hair and larger and medium ones underneath and here's what I got:

This is what it looked like relatively soon after I took out the curlers
After I brushed out the curls with my fingers, it loosened up a bit and ended up like this:

Less Bo Peep---more natural looking curls!

The next day or so, I tried these curlers again and used jumbo curlers on top and the medium ones on the bottom and ended up with looser curls in general:


Personally, I like this much better.  You just have to play around with the size of the curlers and how long you leave them in and find what best suits your hair!

Overall, I loved these curlers.  They are so much more comfortable than the traditional hot rollers with pins that I have.  Not to mention that since the clips are heated, you get heat not only from the roller, but the clip as well.  Since my hair is super layered, the clips also helped curl the stray hairs that normally stick out when I use hot rollers, so it all looked more even.  AND the clips also help keep some of the heat away from your scalp.  I don't know if I'm just a spaz or what but my old rollers got so hot and would lay on your head and just burn.  These don't do that.

My only issues with these curlers were that the clips made the rollers feel very loose.  However, since they only need to stay in for about 10 minutes, it's not a big issue.  I still could've easily applied make-up or gotten ready without a problem--just no working out or anything with them in ;)

It also would've been cool if there was a secret drawer underneath the product to store all the clips since you can only put 3 inside with the curlers, but I found a cute bag to put them in--so whatever!

Overall, not too much to complain about since they heat up so quickly and end up being so comfortable!

If you want to know more information about the curlers, you can check out their website here.  They also have a handy how-to video if you didn't like my tutorial :)

Onto the fun part!

The nice folks at Conair decided to allow me to host a giveaway for another set of these hot rollers for one lucky winner!  Here are the rules, please read them before entering!

1) You must be 18 or older to enter or else have your parents permission to give away your address if you win
2) This is open to U.S. residents only
3) Enter ONLY once, if you enter more than once you will be disqualified.  If you can't remember if you've entered, shoot me an e-mail at EStyles.WW@gmail.com and I'll let you know!
4) This is open until November 11, 2011 at 11:59 p.m. EST!
5) To enter you MUST be a follower via GFC.


You get 1 automatic entry for being a GFC follower and filling out the form!  Here are some ways you can get additional entries into the contest:


-Follow @ElementalStyles on Twitter [1 entry]
-Tweet about the giveaway (provide a direct link!) [2 entries]
-Follow Elemental Styles on Facebook (provide Facebook name) [1 entry]
-Blog about the giveaway (on sidebar, giveaway page or blog entry--provide a direct link) [2 entries for a link, 3 entries if you use one of the pictures]
-Add Elemental Styles to your blog roll (provide a link please!) [1 entry]
-Answer the extra question on the form [1 entry each]

This giveaway is now closed!  Thanks for entering :)

Also be sure to check out Conair's Facebook Page for cool product information!
 
<3 Whitney

Friday, October 14, 2011

NEW! My (Original) 30-Day Nail Polish Challenge!

SO it's come to my attention that whoever initially created the 31-Day Nail Challenge is a little cheesed off that no one has given her credit for it.

Unfortunately I actually still don't know WHO that is, so I'm going to stop doing her challenge and finish it up with my OWN challenge!  I don't want to step on anyone's toes or whatever.

So here is my new challenge.  I did end up keeping the first color days the same since I've already done those, and I know there are repeats (like glitter and watermarble) but seriously, there's only so much I can do with my nails.  Feel free to use it/do whatever you want with it.  You can use or not use the picture, cut off my name, credit me or not, I don't really care!


So I guess next time I do my nails I'll be on Day 7: Silver nails!  So stay tuned for that, and I hope you guys are enjoying your weekend!

P.S. Maybe later tonight I'll update again with my promised surprise!  I got things to do first!

Wednesday, October 12, 2011

Julep Maven Program

Okay!  Real quick....I'm going to show you ladies what I got from my two months in the Julep Maven Program!  You get $40+ worth of Julep products every month, personalized so you'll enjoy it, for only $20/month.  And you can cancel or skip a month at any time.

I signed up in time for the September box and used a 50% off coupon so my first box was only $10! Here's what I got:


First up!  I got the Julep Glycolic Hand Scrub (normally $32).  Here's what Julep has to say about it: "Potent glycolic acid combined with apricot seeds provides powerful double exfoliation that leaves your hands feeling noticeably softer and looking younger after just one use.  Naturally scented with orange oil for a refreshing aromatherapy boost with each use."

Next I got the Julep Nail Therapy (normally $16)--a clear base coat that increases nail strength and flexibility!

I also got two nail polish colors.  Samantha (normally $14) is the bright pink polish on the right and Zoe ($14), the copper polish on the left.  Here's a better picture of Zoe:


So I got my whole box for $10 that had $76 worth of products in it!  I enjoyed it.  I have only tried the glycolic hand scrub once--it's a great exfoliator but I kind of forget to use these kinds of things.  I do like the nail therapy a lot, though!

For my October box, here's what I got:


I just received this box the other day and I haven't tried anything except Julep Chloe (the dark purple polish on the left), but I can let you know what I got anyway:

The Age Defying Hand Brightener (normally $32).  Here's what Julep has to say about it since I haven't tried it yet: "The Age Defying Hand Brightener visibly minimizes the appearance of fine lines and age spots on your hands, adding radiant glow and evening skin tone.  Contains rare African plant extracts that are clinically proven to block melanin production and reduce hyper-pigmentation and micro light diffusing technology gives hands an instant glowing and luminescent appearance.  Advanced emulsion system imparts water-resistant, non-greasy softness."  Sounds great and I'm pumped to try it with the Hand Scrub!

I also got two colors: Chloe, which I already reviewed, and a beautiful white glitter top coat called Vanessa.  $60 worth of product for only $20!

Initially I passed on this month because I was short on cash, but it got sent to me on accident anyway.  I'm glad it did!  Although unfortunately, since the neighbor kids are shady, the box had been ripped open and gone through :/

I think the Julep maven program is a really good deal if you like their products!  You should sign up and try it, especially because you can get the first box for cheap!  You even get free shipping and 20% off every time you order something from Julep if you're a Maven!

Use my referral link to sign up (I get credit for it!) and try these two coupon codes to get your first box for only $5!  "FIRST 5" or "WELCOMEMV5" or "FB".  Hopefully one of those works for you! 

Good luck ladies!

<3 Whitney

Tuesday, October 11, 2011

31 Day Challenge, Day 6! Julep Chloe!

Soooo I haven't been showing off my Julep Maven boxes...I promise I'll do that tomorrow and show you ladies who haven't signed up what you can get!

What I got from my October box included Julep Chloe...in the bottle it's a beautiful dark purple with suspended purple glitter that looks just awesome.

On the nail, however it looks almost black unless you're in the sunlight.  It's a bit too dark for me personally, but it's a great fall/winter color and I'm hoping it'll grow on me...'cause I'm not going to have time to do them again for a few days!


You can see the purple in the bottle in this picture


Nails look black...eh.

The polish itself didn't have the best consistency.  I haven't got the Julep application down yet--since the bottle is so skinny and the brush is so long, it is hard to get excess polish off of the brush.  If you don't get enough excess off, it runs down the whole length of the brush before you're done painting the nail...and ugh!  Some of the other Julep polishes aren't as bad, but since this one was a thicker polish, it was hard.  Howeverrrr I ignored the thickness and celebrated because this polish covered completely in only two coats!  It tried a little more matte than I prefer as well, but with some Seche Vite top coat it was awesomely shiny!  Horray!

How are you guys enjoying the Maven program?  What category did you get?  I got Bombshell.  Sounds sexy...not sure how I got there lol.

<3 Whit

Monday, October 10, 2011

31 Day Challenge, Day 5! ORLY + Klean Color Chunky Holo Teal!

Ooohh dear I can't believe I even made it to day 5 on this challenge, haha.

For this day I decided to try another polish I haven't used before: ORLY It's Up to Blue topped with Klean Color Chunky Holo Teal!

It's Up to Blue is a little frosty and streaky for me.  It's a fun bright summer color but I don't think I'd wear it any other time, so it was only on for a day!  I had to use three coats to get it semi-smooth looking:

It was getting dark so the color looks ulta bright blue

Inside it's a little tealy looking

I topped this with two coats of Klean Color Chunky Holo Teal.  Pictures for this kind of failed:

Inside picture since I did this at night...but you can still see all the great colors in CHT!

Since I had 900 coats of polish, when I went to take outdoor pictures the next day, it had got all wrinkled :(

Due to wrinkly pictures, here are two of my notoriously weird looking right hand!

Check out those flakies!

Ahhh it's so bright!  I didn't love the brightness of the blue since it's getting colder and I'm kind of bitter, haha--so I'm kind of glad it got messed up so I could take it off and put on a more "autumn" toned color.  Stay tuned for day 6 (violet) tomorrow ;)

<3 Whitney

P.S. I haven't forgot about my promised surprise!

Sunday, October 9, 2011

31 Day Challenge, Day 4! Zoya Apple!

Don't think I've forgotten about this challenge, ladies!  I'm still here.  It's hard for me to update during the week with my crazy job, but I HAVE been painting my nails!  I've got a few days worth of posts done today, so horray!

I am really liking this challenge though, because along with the 31-day challenge, I am also doing my own "never tried" challenge and using polishes I've never used before to complete it!

Along with my never tried challenge, I've finally tried the last of the Zoya Sunshine Collection: Apple!  I am not too keen on green nails, but I'm glad I tried this because I liked it a lot!

I initially tried to have an accent nail of a CG Happy Go Lucky with Kermit the Frog painted on it, but after trying to paint him FOUR times (twice on each hand), I gave up.  I ended up with mixing my own lighter green polish (That I had hopefully named Kermit) and using that as a base with some flower stickers I had:

Happy Go Lucky accent nail...sans Kermit :(


Accent nail of my own mixed polish (Kermit) with some stick on flowers!


I ended up liking this mani okay and wore it for a few days.  The people at work were confused by my accent nail, but I don't care!  And sorry for my picture quality...I did this at night time and ended up having to take indoor pictures--lame salsa!

Anywho--this is 3 coats of Apple and three coats of HGL/Kermit.  I tend to do three coats of everything regardless if it's necessary, haha.  I love the Sunshine Collection, they're great!  Zoya polishes only tend to work well (and by that I mean last more than a day) with certain base coats and now that I've found some, I like them a lot.  I'm glad I bought the whole collection!

Wellllllll I hope you guys are enjoying my challenge posts--I'm enjoying doing them!  I've got a surprise for you all later in the week, so stay tuned!

<3 Whitney